
Photoshopissa valintojen tekemisessä on todella kahta tyyppiä ihmisiä - ne, jotka osaavat käyttää Pen-työkalua, ja ne, jotka kamppailevat. Useimmat ihmiset lykkäävät kynätyökalun käytön oppimista niin kauan kuin mahdollista, kun taas toiset eivät koskaan pääse siihen oppimaan, uskoen, että se on aivan liian hämmentävä, liian monimutkainen ja yksinkertaisesti luonnoton.
Viime kädessä heidän työnsä Photoshopissa kärsii siitä, koska he ovat jumissa luottaa Lasso-työkaluun melkein kaikessa, mitä he eivät voi valita suorakaiteen tai elliptisen telttatyökalun avulla. Tässä Adobe Photoshop -oppaassa lopetetaan kärsimykset. Opimme kuinka helppoa on valintojen tekeminen kynätyökalulla.
Nyt kun sanon "helppo", en tarkoita, että aiot lukea tämän opetusohjelman ja muuttua heti kynämestariksi. Kynätyökalun käytön oppiminen on paljon kuin pyöräilyn oppiminen. Kun olet oppinut, se vaikuttaa täysin luonnolliselta ja ihmettelet, kuinka kukaan ei ehkä osaa käyttää jotain niin yksinkertaista. Mutta päästä siihen pisteeseen vaatii vähän harjoittelua ja vaivaa, ja kun luet jokaista pyörällä ajamista koskevaa kirjaa, voit opettaa sinulle perusteet siitä, kuinka polkimet, vaihteet ja jarrut toimivat, vasta kun olet pyörällä kamppailemassa pitääksesi tasapainon, että todellinen oppiminen alkaa.
Yksi hienoista kynätyökalun ominaisuuksista on, että se ei ole asia, joka on yksinomainen Photoshopille. Kaukana siitä! Lähes kaikki suositut valokuvien editointi-, grafiikka- ja sivuasetteluohjelmat käyttävät kynätyökalua muodossa tai toisessa, joten kun olet oppinut käyttämään sitä Photoshopissa, sinulla on jo hyvä käsitys siitä, kuinka sitä käytetään monissa myös muut ohjelmat!
Mistä löydän kynätyökalun?
Ennen kuin aloimme puhua siitä, mitä kynätyökalu on tai kuinka sitä käytetään, meidän on tutkittava, mistä se löytyy Photoshopista. Löydät Kynä-työkalun Työkalut-paletista, joka on ryhmitelty Muoto-työkalut, Tyyppi-työkalu ja Polun valinta (valkoinen nuoli) ja Suora valinta (musta nuoli) työkaluihin (katso kuva vasemmalla).
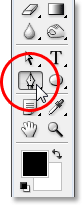
Photoshopin kynätyökalu
Tämä voi tietysti herättää kysymyksen siitä, miksi, jos voimme tehdä valintoja kynätyökalulla, eikö sitä ryhmitellä muihin valintatyökaluihin (suorakulmainen telttatyökalu, elliptinen telttatyökalu, Lasso-työkalu jne.) Osoitteessa Työkalut-paletin yläosa? Miksi se on niiden muiden työkalujen kanssa, jotka eivät selvästikään ole valintavälineitä?
Se on erinomainen kysymys, ja siihen vain sattuu olemaan yhtä erinomainen vastaus, johon päästämme hetkessä.
Miksi sitä kutsutaan "kynä" -työkaluksi?
Yksi ensimmäisistä kompastuskohdista kynätyökalun käytön oppimiselle, kuten monille muille Photoshopin asioille, on sen nimi, koska loppujen lopuksi, jos on yksi asia, jonka kaikki, jotka ovat koskaan yrittäneet käyttää sitä, tietävät, tämä asia ei ole kynä. Ainakin ei sellaista kynää, jonka normaalisti ajattelet kuuleessasi sanaa "kynä". Kokeile kirjoittaa nimesi sillä samalla tavalla kuin voit allekirjoittaa nimesi paperille paperilla kynällä ja pääset todennäköisesti kiertyneeseen, sekavaan sotkuun ja asioihin, jotka kiertävät toisiaan (luulen tietysti, että voisi hyvin olla se, kuinka allekirjoitat nimesi).
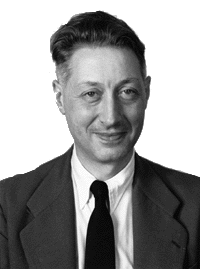 Pierre Bezier
Joten jos se ei toimi kuten perinteinen mustekynä, miksi sitä kutsutaan kynätyökaluksi? Kynätyökalua on kutsuttu vuosien varrella useaksi asiaksi, ja en tarkoita sitä, millaisia asioita olet ehkä kutsunut turhautumisen hetkinä. Olet ehkä kuullut siitä, että sitä kutsutaan Bezier-kynäksi tai Bezier-työkaluksi, ja johtuu siitä, että sen on luonut mies nimeltä Pierre Bezier (se on hän vasemmalla), ranskalainen insinööri ja ympäröivä älykäs kaveri, joka keksi fancy matematiikka, joka käyttää työkalua työskennellessään Renault-autoyrityksessä (Pen Tool on alun perin luotu autoja suunnittelemaan).
Olet ehkä kuullut myös Paths Tool -nimisen kynätyökalun, ja se on todella sopivin nimi sille. Kynätyökalun tarkoituksena on piirtää "polkuja". Jos haluat tehdä valintoja kynätyökalulla, muuntamme yksinkertaisesti piirretyt polut tai polut valinnoiksi. Se alkaa kuitenkin aina polulta.
Lyhytkoodit, toiminnot ja suodattimet-laajennus: Virhe lyhytkoodissa (ads-basics-middle-2)
Mikä on polku?
"Polku" on rehellisesti sanottuna jotain, joka saattaa tuntua hiukan sopimatta Photoshop-kaltaisessa ohjelmassa. Syynä siihen, että Photoshop on ensisijaisesti pikselipohjainen ohjelma. Se vie miljoonia pieniä neliöpikseliä, jotka muodostavat tyypillisen digitaalisen kuvan ja tekee asioita niiden kanssa. Poluilla ei sitä vastoin ole mitään tekemistä pikselien kanssa, minkä vuoksi sanoin, että ne saattavat tuntua paikallaan ohjelmassa, jota käytetään pääasiassa pikselien muokkaamiseen ja piirtämiseen.
Polku ei todellakaan ole muuta kuin linja, joka kulkee pisteestä toiseen, linja, joka on täysin riippumaton ja ei välitä mitään sen alla olevista pikseleistä. Viiva voi olla suora tai kaareva, mutta se kulkee aina pisteestä toiseen, ja kuten mainitsin, sillä ei ole mitään tekemistä kuvan pikselien kanssa. Polku on täysin erillinen itse kuvasta. Itse asiassa polku on niin erillinen, että jos yrität tulostaa kuvan näytöllä näkyvällä polulla, polku ei tule näkyviin paperille. Jos tallensit kuvan JPEG.webp-tiedostona ja latasit sen verkkosivustolle, vaikka tallensit kuvan Photoshopissa näytöllä näkyvällä polulla, et näe sitä verkkosivustossa olevassa kuvassa. Polut ovat vain silmällesi ja Photoshopille. Kukaan muu ei koskaan näe niitä, paitsi jos he sattuvat kävelemään tietokoneesi ohi, kun työskentelet.
Tarvitsemme aina vähintään kaksi pistettä polun luomiseen, koska meidän on tiedettävä mistä polku alkaa ja missä se loppuu. Jos käytämme tarpeeksi pisteitä, joiden avulla pystymme palauttamaan polun takaisin samaan kohtaan, josta se alkoi, voimme luoda poluista erilaisia muotoja, ja Photoshopin eri muotovälineet toimivat juuri näin. Suorakulmatyökalu käyttää pisteiden yhdistämiä polkuja suorakulmaisen muodon piirtämiseen. Ellipse-työkalu käyttää pisteiden yhdistämiä polkuja elliptisen muodon piirtämiseen ja niin edelleen. Se on myös miten Photoshopin Type Tool toimii, vaikka Photoshop käsittelee tyyppiä hieman eri tavalla kuin se käsittelee tavallisia muotoja, mutta Photoshopin kaikki tyypit ovat pääosin polkuja. Itse asiassa voit muuntaa tyypin muodoiksi, jolloin saat kaikki samat polunmuokkausvaihtoehdot tyypillä, jotka saat muotojen kanssa työskenneltäessä.
Olet ehkä kuullut myös polkuja, joihin viitataan ääriviivina, ja se on melko hyvä kuvaus siitä, mikä polku on tai ainakin mitä polku voi olla. Voimme piirtää neliömäisen reitin, ja jos emme tee mitään muuta sen kanssa, kuten emme täytä sitä värillä tai kohdista siihen viivaa, niin meillä on vain neliön peruspiirteet. Sama ympyrän tai muun piirtämämme muodon kanssa. Polku itsessään on vain muodon ääriviiva. Polusta tulee tosiasiallisesti jotain muuta kuin peruspiirtää, ennen kuin teemme jotain polulla, esimerkiksi täytämme sen, kohdistamme iskun tai muunnamme sen valinnaksi.
Voit valita koko reitin Polunvalintatyökalulla (tunnetaan myös nimellä "musta nuoli" -työkalu), tai voit valita yksittäisiä pisteitä tai polun segmenttejä käyttämällä suoraa valintatyökalua ("valkoinen nuoli" -työkalu). Polku "segmentti" tai "linja segmentti", kuten sitä joskus kutsutaan, on mikä tahansa reitti kahden pisteen välillä. Esimerkiksi suorakaiteen muotoinen polku koostuisi neljästä pisteestä (yksi jokaisessa nurkassa), ja yksittäiset polut, jotka yhdistävät pisteitä yhdessä ylä-, ala-, vasemmalla ja oikealla puolelle suorakaiteen muodon muodostamiseksi, ovat polun segmentit . Itse todellinen polku on yhdistelmä kaikista muodon muodostavista yksittäisistä reittisegmenteistä.
Se voi olla hieman hämmentävä, joten katsotaan mitä tarkoitan. Avaa uusi asiakirja Photoshopissa. Sillä ei ole väliä minkä kokoinen se on. Valitsen koko 640x480 esiasetusten luettelosta, mutta kuten totesin, sillä ei ole väliä minkä koon valitset. Valitse kynätyökalu Työkalut-paletista. Voit myös valita Kynätyökalun yksinkertaisesti painamalla näppäimistön P-kirjainta.
Kaksi kynätyökalutilaa
Nyt, ennen kuin jatkamme, meidän on ensin varmistettava, että työskentelemme polkujen kanssa, ja se johtuu siitä, että Pen-työkalussa on todella kaksi eri tilaa, joissa se voi toimia, ja oletusarvoisesti se käyttää toista. Kun Kynätyökalu on valittu, jos etsimme näytön yläosassa olevaa Asetukset-palkkia, näemme ryhmän, jossa on kolme kuvaketta:

Photoshopin Asetukset-palkki, joka näyttää kolmen kuvakkeen ryhmän, jotka edustavat kutakin kolmesta kynätyökalutilasta.
Tiedän, että sanoin, että kynätyökalu voi toimia kahdessa tilassa, ja silti ikään kuin asiat olisivat hämmentäviä, siinä on kolme kuvaketta, mutta oikealla oleva kuvake, joka on Täytä pikseli -kuvake, on harmaana eikä ole käytettävissä työskennellessään. kynätyökalulla. Se on käytettävissä vain, kun työskentelet eri muotovälineiden kanssa, joten meidän on tarkasteltava vain kahta kuvaketta.
Vasemmalla oleva kuvake on Muotokerrokset-kuvake, joka tunnetaan myös nimellä "ei haluamamme", ja se on oletusasetuksena valittu kuvake. Jos toimisimme kynätyökalun kanssa, kun kyseinen kuvake olisi valittu, piirtäisimme muotoja, aivan kuin käyttäisimme mitä tahansa muista Muototyökaluista paitsi, että sen sijaan, että piirtäisimme ennalta määritetyn muodon, kuten suorakulmion tai ellipsin, voisi piirtää minkä tahansa halusimme muodon. Kuten sanoin, sitä ei kuitenkaan halua. Haluamme sen viereisen kuvakkeen, Polut-kuvakkeen, joten siirry eteenpäin ja valitse se napsauttamalla sitä:

Photoshop-oppaat: Napsauta Asetukset-palkin "Polut" -kuvaketta, kun haluat käyttää polkuja Pen-työkalun avulla.
Kun Kynätyökalu on valittu ja Polut-kuvake valittu Asetukset-palkista, napsauta kerran missä tahansa dokumentin sisällä. Älä napsauta ja vedä, napsauta vain. Kun teet, lisäät pienen neliöpisteen. Olen laajentanut sitä täällä:

Napsauta kerran asiakirjan sisällä kynätyökalulla lisätäksesi pisteen.
Tämä ensimmäinen kohta, jonka juuri lisäsimme, on polkumme lähtökohta. Nyt tällä hetkellä meillä ei oikeastaan ole polkua. Meillä on vain lähtökohta. "Pistettä" kutsutaan teknisesti ankkuripisteeksi tai ankkuripisteeksi, ja sille on annettu nimi, koska se kiinnittää polun paikoilleen. Tämä ensimmäinen kohta ankkuroi polun alkuun tähän kohtaan asiakirjan sisällä. Kun lisäämme lisää pisteitä, kukin niistä kiinnittää polun paikoilleen kyseiseen sijaintiin.
Lisäämme toisen asian. Napsauta jotain muuta asiakirjan sisällä. Minne tahansa tulee. Napsautan jonnekin lähtöpisteeni oikealla puolella:

Photoshop-oppaat: Lisää toinen kiinnityspiste napsauttamalla jotain muuta asiakirjan sisällä.
Olen nyt lisännyt toisen kiinnityspisteen, ja katso mitä tapahtui. Minulla on nyt suora viiva yhdistämällä kaksi pistettä yhteen! Tuo suora on minun tieni. Kuten aiemmin mainitsin, tarvitsemme vähintään kaksi pistettä polun luomiseen, koska meidän on tiedettävä mistä polku alkaa ja missä se loppuu, ja nyt kun meillä on sekä lähtö- että päätepiste, Photoshop pystyi yhdistämään kaksi pistettä yhdessä, luomalla polun.
Lisäämme vielä muutama kohta vain hauskanpitoa varten. Napsauta vielä muutama kerta dokumentin eri kohdissa. Älä taas napsauta ja vedä, napsauta vain:
Lisää lisäpisteitä napsauttamalla asiakirjan sisällä olevia eri kohtia.
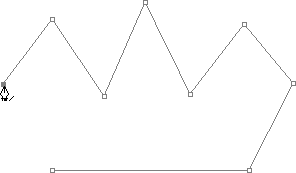
Yllä olevaan kuvaan olen lisännyt vielä seitsemän kiinnityspistettä napsauttamalla eri kohtia kynätyökalulla, ja joka kerta kun lisäsin yhden, polkuni pituus kasvoi, koska edellisen pisteen ja uuden välin väliin lisättiin uusi polku "segmentti" uusi kohta. Polkuni koostuu nyt yhdeksästä ankkuripisteestä ja kahdeksasta polkusegmentistä. Voisin jatkaa napsauttamista asiakirjan sisäpuolella lisätäksesi lisää kiinnityspisteitä ja polkuosia, mutta mitä haluaisin nyt tehdä, on sulkea polkuni, jotta se muodostaa täydellisen muodon.
Polun sulkeminen
Polun sulkemiseksi meidän tarvitsee vain napsauttaa vielä kerran alkuperäistä lähtöpistettä. Kun viet hiiren osoittimen lähtöpisteen päälle, kynäkuvakkeen oikeassa alakulmassa näkyy pieni ympyrä:

Kynäkuvakkeen oikeaan alakulmaan ilmestyy pieni ympyrä, kun kohdistin viedään polun alkuperäisen lähtökohdan päälle.
Tämä ympyrä kertoo meille, että olemme tulossa "täysi ympyrä" polkamme kanssa, viimeistelemällä sen lähtökohtaansa. Sulje se napsauttamalla suoraan lähtökohtaa.
Alla näemme, että polustani on tullut suljettu polku ja se on nyt muodon peruspiirteet:
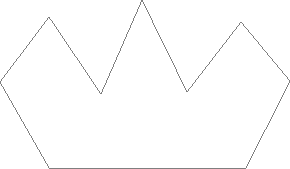
Polku on nyt suljettu, päättyen lähtöpisteeseen ja luo suljetun polun.
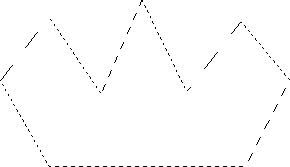
Vaikka tämä polku piirrettiin vain hauskanpitoa varten esimerkiksi siitä, kuinka piirtää peruspolku kynätyökalulla, voin helposti muuttaa tämän polun valinnaksi. Tätä varten tarvitsemme Photoshopin Paths-paletin, ja tarkastelemme sitä seuraavaksi.
Polun kääntäminen valinnaksi
Toistaiseksi olemme tarkastelleet, mikä polku on ja kuinka piirtää peruspolku Photoshopin Pen-työkalulla. Mutta miten teet valinnan polulta?
Helppo! On olemassa muutamia tapoja muuttaa polku valinnoiksi, mukaan lukien kätevä pikanäppäin, mutta katsotaanpa virallista tapaa ennen nopean tavan katsomista. "Virallinen tapa" tarkoittaa Photoshopin Paths-paletin käyttöä, joka löytyy ryhmitettynä Tasot-paletti- ja Kanavat-paletista:
Photoshopin polkupaletti.
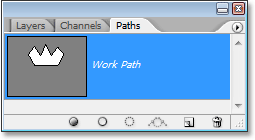
Ensi silmäyksellä Paths-paletti näyttää hyvin samanlaiselta kuin Photoshopin Layers -paletti, ja Adobe teki siitä tarkoituksella, joten tunnet olosi mukavammaksi käyttää sitä. Voimme nähdä pikkukuvan esikatselusta juuri luomiamme polun muodosta, ja Photoshop nimeää oletuksena polun "Työpolku", joka on pohjimmiltaan hieno tapa sanoa "väliaikainen", ikään kuin luisit erilaisen polku nyt nimeämättä tätä polkua ensin jollekin muulle, tämä korvataan uudella polulla. Sinulla voi olla vain yksi "Työpolku", joten jos haluat pitää sen, sinun on kaksoisnapsautettava sen nimeä Paths-paletissa ja nimettävä se jollekin muulle ennen uuden polun luomista.
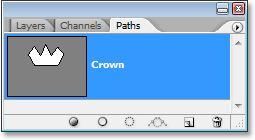
Koska polkuni näyttää vähän kruunulta, aion kaksoisnapsauttaa nimeä "Työpolku", joka tuo esiin Photoshopin Tallenna polku -valintaikkunan, ja aion nimetä polkuni uudelleen "Kruunu":

Voit tallentaa väliaikaisen "Työpolun" yksinkertaisesti nimeämällä sen uudelleen.
Napsautan OK, kun olen valmis, ja jos nyt tarkastelen Paths-palettini uudelleen, voin nähdä sen tarpeeksi varmasti, että "Work Path" on nimetty uudelleen "Crown":
Polkujen paletti, joka osoittaa, että polku on nimetty uudelleen "kruunu".
Nimeämällä se uudelleen, polku on nyt tallennettu, eikä se katoa minusta, jos aion luoda uuden polun. Lisäksi kaikki tallennetut polut tallennetaan Photoshop-dokumentin kanssa, joten nyt, jos tallennan asiakirjan, polku tallennetaan sen mukana ja seuraavan kerran avaessani asiakirjan, polku on silti Paths-paletissa.
Polun tallentaminen ei ole jotain mitä sinun täytyy tehdä, jotta se muuttuu valinnaksi. Useimmissa tapauksissa, kun valitset kynätyökalua, et tarvitse polkua, kun olet valinnut siitä, joten sitä ei tarvitse tallentaa. Jos kuitenkin haluat tallentaa sen, nimeä se vain jollekin muulle kuin "Työpolku" ja se tallennetaan.
Polun kääntämiseksi valinnaksi, jos tarkastelemme Paths-paletin alaosaa, näemme useita kuvakkeita. Näiden kuvakkeiden avulla voimme tehdä erilaisia asioita polullamme. Ensimmäinen vasemmalla oleva kuvake on Täytä polku etualalla -värikuvake, ja kuten nimensä osoittaa, sen napsauttaminen täyttää reitin nykyisellä etualan värillä. Mielenkiintoista, mutta se ei ole mitä haluamme. Toinen kuvake vasemmalta on Stroke polku harjakuvakkeella, joka kohdistaa radan polullemme millä tahansa nykyisellä harjalla.
Tämä on loistava tapa luoda mielenkiintoisia tehosteita Photoshopiin, mutta sillä, mitä teemme täällä, kääntämällä polku valintaan, se ei ole myöskään haluamamme. Haluamme haluamasi kolmannen kuvakkeen vasemmalta, latauspolun valintakuvakkeeksi:
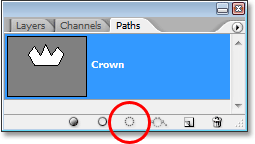
"Lataa polku valintana" -kuvake Polku-paletin alaosassa.
Heti kun napsautin tätä kuvaketta, polustani dokumentistani tulee valinta, ikään kuin olisin luonut sen jollain Photoshopin yleisimmistä valintatyökaluista:
Polku on nyt muutettu valintaksi.
Se on niin helppoa! Itse asiassa se on jopa helpompaa kuin siksi, että siellä on pikanäppäin polun muuttamiseksi valinnaksi ilman, että joudutaan vaihtamaan Polkuja-palettiin. Kun olet piirtänyt polun ja olet valmis muuttamaan sen valinnaksi, paina vain Ctrl + Enter (Win) / Command + Return (Mac) saadaksesi Photoshop muuntamaan polun valinnaksi.
Tähän mennessä voi olla sinulle selkeämpää, miksi, vaikka kynätyökalu onkin hyvin valintatyökalu, sitä ei ole ryhmitelty muihin työkalupaletin yläosassa oleviin valintatyökaluihin. Syynä on, että kynätyökalu on ensisijaisesti polkutyökalu. Se luo valintoja luomalla ensin polkuja, ja tästä syystä sillä on enemmän yhteistä erilaisten Muoto-työkalujen ja Tyyppityökalujen kanssa, jotka kaikki käyttävät polkuja, kuin se on perusvalintatyökalujen, kuten Suorakulmainen Marquee -työkalu tai Lasso, kanssa. Työkalu, joka tekee valinnat vain pikselien perusteella.
Katsotaanpa käytännön esimerkkiä siitä, mitä olemme oppineet tähän mennessä. Tässä meillä on valokuva pysäkkimerkistä joidenkin kallioisten kallioiden edessä:

Kuva stop-merkistä.
Oletetaan, että halusin valita tämän pysäytysmerkin, jotta voin kopioida sen omaan kerrokseen. Pysäytäkyltti koostuu vain yhdestä suoria linjoista, jotka tekevät tästä erittäin helpon. Ensinnäkin tarvitsen lähtöpisteeni polulleni, joten aloitan merkin vasemmassa yläkulmassa napsauttamalla kerran asettaaksesi ensimmäisen kiinnityspisteen. Tässä tapauksessa ei ole väliä missä aloitan polun, mutta aloitan vasemmasta yläkulmasta:
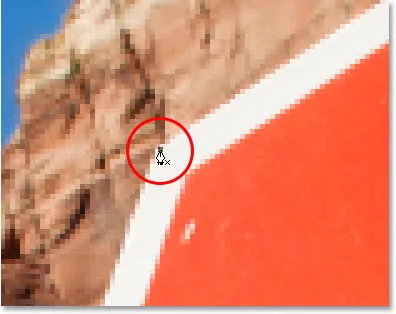
Napsauttamalla kerran pysähdysmerkin vasemmassa yläkulmassa aloittaaksesi polun alkuperäisellä kiinnityspisteellä.
Huomaa, kuinka olen lähestynyt tätä napsauttaessani. Löydät kuvasi hieman helpommaksi, kun teet valintoja Kynä-työkalulla. Tällä tavoin voit olla varma, että pysyt polullasi vain valitsemallasi alueella.
Tällä hetkellä minulla ei ole polkua, minulla on vain lähtökohta polulleni. Polun luomiseksi minun on mentävä vain kyltin ympäri, joka lisää kiinnityspisteen jokaiseen nurkkaan, missä polun on muutettava suuntaa. Kun lisään jokaisen ankkuripisteen, ilmestyy uusi reittiosa, joka yhdistää edellisen ankkuripisteen uuden kanssa, kunnes olen kulkenut kaiken kyltin ympäri. Suljekseni polun napsauttamalla takaisin alkuperäistä lähtökohtaa. Se on hiukan vaikea nähdä alla olevassa kuvakaappauksessa, mutta minulla on nyt polku koko pysäytysmerkin ympärillä, mukaan lukien kiinnitetty posti, yksinkertaisesti menemällä ympäri napsauttamalla nurkassa, missä polun täytyy muuttaa suuntaa:

Polku näkyy nyt kuvan stop-kyltin ympärillä.
Jos tarkastelen Paths-palettia nyt, voin nähdä selvästi, että minulla on polku stop-muodon muodossa:
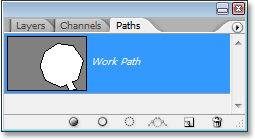
Photoshopin Paths-paletti osoittaa polun, joka on piirretty stop-kyltin ympärille.
Huomaa, kuinka Photoshop on nimennyt polun "työpoluksi", mikä tarkoittaa, että tämä polku on väliaikainen ja kadon sen, jos luon toisen polun tallentamatta tätä ensin nimeämällä se uudelleen. Vaikka en luo uutta polkua, menetän sen silti sulkeessani asiakirjan, ellei tallenna sitä ensin. Minun ei kuitenkaan tarvitse tallentaa tätä polkua, joten en ole siitä huolissani. Useimmissa tapauksissa myöskään sinun ei tarvitse huolehtia siitä.
Muuntaakseni polkuni valinnaksi napsauttamalla Lataa polku -valintakuvaketta Tasot-paletin alaosassa, tai voisin yhtä helposti painaa Ctrl + Enter (Win) / Command + Return (Mac):
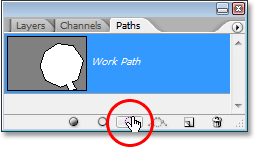
Napsauta "Lataa polku valintana" -kuvaketta Paths-paletissa tai paina "Ctrl + Enter" (Win) / "Command + Delete" (Mac) muuntaaksesi polun valinnaksi.
Heti kun teen, polkuni muunnetaan valinnaksi ja stop-merkki on nyt valittu:

Pysäytysmerkki valitaan nyt polun muuntamiseksi valinnaksi.
Siirtyen takaisin Tasot-palettiini ja kopioin pysäytysmerkin omaan kerrokseensa käyttämällä pikanäppäimiä Ctrl + J (Win) / Command + J (Mac), joka sijoittaa merkin omilleen kerros taustakerroksen yläpuolella:
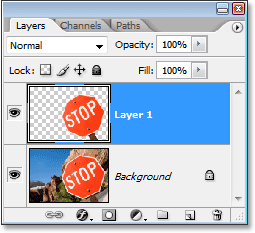
Pysäytysmerkki on nyt kopioitu omaan erilliseen kerrokseen.
Kun merkki on nyt omalla kerroksellaan, voin tehdä sen, mitä haluan, vaihtamalla taustan toisella kuvalla tai tehdä taustasta mustavalkoisen ja jättäen merkin värilliseksi, mitä voin ajatella. Asia on, että pystyin helposti valitsemaan merkin napsauttamalla kulmia kynätyökalulla, joka loi polun merkin ympärille, ja sitten muutin polun yksinkertaisesti valinnaksi.
Tähän mennessä olemme tarkastelleet valintojen tekemistä Photoshopin kynätyökalulla, olemme oppineet, että kynä on joka kerta valinnan työkalu Photoshopin yleisimmin valintatyökaluina, kuten suorakulmainen teltta ja Lasso-työkalut, mutta että valintojen tekemisen sijaan pikselien tapaan kuin muut työkalut tekevät, Pen-työkalu piirtää polut, jotka voidaan sitten helposti muuntaa valinnoiksi joko Polku-paletista tai käyttämällä nopeaa pikanäppäintä.
Siksi kynää ei löydy työkalupaletin yläosasta muiden pikselipohjaisten valintatyökalujen kanssa, vaan se ryhmitellään sen sijaan polkutyökaluihin, kuten erilaisiin Muototyökalut, Tyyppi-työkalu ja Polunvalinta- ja Suoravalintatyökalut . Kynätyökalu sisältää polut, ei pikseleitä.
Olemme oppineet, että voimme lisätä asiakirjaan sisälle ankkuripisteitä, jotka ankkuroivat polun paikoilleen, napsauttamalla vain erilaisia kohtia kynätyökalulla, ja kun lisäämme yhä enemmän ankkuripisteitä, luomme polun jokaisena uudena pisteenä yhdistetään edelliseen pisteeseen uudella polku-segmentillä. Olemme myös oppineet, että polkua kutsutaan tyypillisesti "tulostamattomaksi elementiksi", mikä tarkoittaa, että riippumatta siitä kuinka monta polkua lisäämme, mikään niistä ei ole näkyvissä paperilla, kun menemme tulostamaan kuvaa . Ne eivät myöskään tule näkyviin, jos näytämme kuvan verkkosivustolla. Polut näkyvät vain meille, kun työskentelemme Photoshopissa (vaikka muut ohjelmat, kuten Adobe Illustrator, tukevat myös polkuja). Polusta tulee jotain muuta kuin pelkkää muodon ääriviivaa, ennen kuin teemme jotain polulla, esimerkiksi täytämme sen värin avulla, kohdistamme siihen viivan tai muunnamme sen valintaan.
Näimme, kuinka helppoa on käyttää kynätyökalua valitaksesi jotain stop-merkkiä, hahmottamalla se polulla, joka koostuu sarjasta suoria reittisegmenttejä, ja kääntämällä sitten polku valintaan. Se on hienoa, mutta todellakaan, emme ole vielä tehneet mitään, jota emme olisi voineet tehdä helpommin jollain kuten Lasso-työkalulla, tai vielä paremmin, Polygonal Lasso -työkalulla, joka on rakennettu erityisesti valitsemalla litteä muotoinen muoto kuten pysäkki merkki. Mahdollisuudet ovat, ellei sinulla ole omituista kiehtovuutta liikennemerkeissä, ennemmin tai myöhemmin haluat valita jotain hieman mielenkiintoisempaa, ja "mielenkiintoisella" tarkoitan haastavampaa. Ja "haastamalla" tarkoitan jotain, joka sisältää käyriä. Kaarevan objektin valitseminen Photoshopissa tapahtuu yleensä silloin, kun menetät kaiken kunnioituksen perusvalintatyökaluille. Onneksi sattuu myös olemaan aika, jolloin kynätyökalu todella paistaa!
Ennen kuin jatkamme, minun on korostettava, että kaikki, mitä olemme tähän mennessä tehneet, on ollut melko yksinkertaista. Napsauta tätä, napsauta siellä, muunna polku valmiiksi, valmis. Tämä seuraava osa, jossa päästämme käyrien piirtämiseen, ei ole aivan yhtä helppoa, vaikka se ei todellakaan ole vaikeaa, mutta jos tämä on ensimmäinen kerta kynätyökalulla tai sinulla ei ole paljon kokemusta siitä, käyrien kanssa työskenteleminen saattaa tuntua vähän luonnoton ja jopa hiukan ylivoimainen. Tässä on ehdottomasti "pyöräily" -analogia. Voit pudota aluksi muutaman kerran ja ihmetellä, kuinka kukaan onnistuu tekemään sen, mutta mitä enemmän harjoittelet ja mitä enemmän pysyt kiinni, sitä järkevämpi se kaikki on alkaa tehdä. Missä tahansa vaiheessa se näyttää sinulle toiselta luonteelta ja ymmärrät yhtäkkiä, miksi niin monet ihmiset vannovat, että kynätyökalu on Photoshopin suurin yksittäinen valintatyökalu! Vakavasti se todella on.
Kahvan saaminen suuntakahvoista
Aloitetaan uudelleen kynätyökalulla. Avaa uusi tyhjä Photoshop-dokumentti tai poista vain aiemmin tekemäsi asiakirja nykyisessä asiakirjassa, jotta aloitamme tuoreen. Sitten valittuna Kynätyökalu ja Asetukset-palkissa valittuna Polut (muista, että oletusasetuksena on Muotokerrokset -vaihtoehto, joten sinun on varmistettava, että Polut-vaihtoehto on valittu), napsauta kerran missä tahansa dokumentin sisällä, aivan kuten teimme ennen. Tällä kertaa kuitenkin sen sijaan, että napsauttaisit vain kiinnityspisteen lisäämistä, napsauta ja vedä sitten hiirtä lyhyen matkan päässä kiinnityspisteestä ennen hiiren painikkeen vapauttamista:
Napsauta mitä tahansa asiakirjan sisällä olevaa kynätyökalua ja vedä sitten lyhyen matkan päässä kiinnityspisteestä.
Kun olet valmis, näet kiinnityspisteen, jossa kaksi viivaa ulottuu siitä. Ensi silmäyksellä saatat ajatella, että olemme jotenkin onnistuneet vetämään polun kynätyökalun avulla. Loppujen lopuksi näyttää siltä, että meillä on kolme kiinnityspistettä, toinen molemmissa päissä ja toinen keskellä, ja kaksi polkuosaa yhdistää ne. Jos katsomme kuitenkin hieman lähemmäksi, voimme nähdä, että kummankin pään kärjet ovat hiukan pienemmät kuin keskellä, ja että ne ovat oikeastaan eri muotoisia. Keskellä oleva neliö on neliö, ja kuten olemme nähneet, kiinnityspiste on neliö, mutta molemmissa päissä olevat näyttävät olevan timantin muotoisia. Ovatko jotkut kiinnityspisteet neliömäisiä ja jotkut timantin muotoisia?
Ei. Kaikki kiinnityspisteet ovat neliömäisiä ja ne ovat kaikki samankokoisia, mikä tarkoittaa, että pienemmät, timantin muotoiset pisteet päissä eivät ole kiinnityspisteitä. Ja jos ne eivät ole ankkuripisteitä, se tarkoittaa, että viivat eivät ole polun segmenttejä, koska tarvitsemme ainakin kaksi ankkuripistettä polun luomiseksi ja tällä hetkellä ainoa ankkuripiste on keskellä. Joten mitä tarkalleen ovat ne linjat, jotka sitten ulottuvat ankkuripisteestä? Ne ovat suuntakahvat!
"Ah, suuntakahvat!" sinä sanot. "Nyt saan sen!"
… … …………….
"Odota, en minä. Mitä helvettiä suuntakahvat ovat?"
Suuntakahvat ovat hyvin kahvoja, ja niitä käytetään vain luotaessa kaarevia reittisegmenttejä. Suoriin kahvoihin ei tarvitse luoda suoraa polkuosaa. Niitä on yleensä kaksi, vaikka joskus on vain yksi, ja kuten olemme jo nähneet, ne ulottuvat kiinnityspisteistä. Niitä kutsutaan "kahvoiksi", koska kuten näemme hetkessä, voit itse tarttua niihin ja liikuttaa niitä.
Suuntakahvat ohjaavat kahta asiaa. He hallitsevat käyrän kulmaa ja hallitsevat käyrän pituutta, ja tekevät sen todella siistillä tavalla. Syynä siihen, että niitä on yleensä kaksi, johtuu siitä, että yksi niistä hallitsee ankkuripisteeseen tulevan käyrän kulmaa ja pituutta, ja toinen ohjaa kiinnityspisteestä ulos virtaavan käyrän kulmaa ja pituutta.
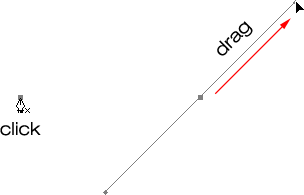
Ennen kuin katsomme, kuinka piirtää käyrät suuntakahvoilla, katsotaan ensin, kuinka ohjataan itse kahvoja, koska menestyminen piirtämällä käyriä riippuu paljon kyvystämme hallita kahvoja. Älä huoli, se ei ole, kuten sanotaan, rakettitiede. On vain muutamia yksinkertaisia asioita, jotka sinun täytyy oppia. Olemme jo nähneet kuinka luoda suunnankahvoja napsauttamalla kynätyökalulla ja vetämällä sitten pois kiinnityspisteestä. Mitä kauemmaksi kiinnityspisteestä vetämme, sitä pidemmät suuntakahvat ovat. Mitä pidempi kahva, sitä pidempi käyrä. Lyhyt kahva, lyhyt käyrä. Pitkä kahva, pitkä käyrä.
Yksi mukavista asioista, jotka opit melko nopeasti kynätyökalusta, on, että se on erittäin anteeksiantava. Ei ole mitään syytä huoleen saada asiat oikein ensimmäistä kertaa piirtämällä polkuja sen kanssa, koska voimme palata takaisin ja korjata asiat helposti, kun olemme valmiita! Laitoitko kiinnityspisteen väärään kohtaan? Ei ongelmaa! Siirrä vain haluamaasi paikkaan! Katsotaan kuinka tehdä se hetkessä. Veditkö suuntakahvan väärään suuntaan? Ei ole ongelma. Tartu kahvaan ja käännä sitä haluamaasi suuntaan. Jälleen näemme kuinka se tehdään. Onko yksi suuntasuhteistasi liian pitkä tai liian lyhyt? Ei ongelmaa. Napsauta vain sitä ja vedä sitä sitten pidempään tai lyhyemmäksi tarpeen mukaan (je, näemme myös, kuinka se tehdään). Polkuja voi muokata jatkuvasti, joten ei ole mitään syytä huolehtia virheen tekemisestä tai sen korjaamisesta ensimmäisellä kerralla. Eikö se tee sinusta tuntuu jo hiukan paremmalta?
Suuntakahvojen pyöriminen ja koon muuttaminen
Kuten mainitsin, niitä kutsutaan suuntaisiksi "kahvoiksi", koska voit tarttua niihin kuin kahvoihin ja liikuttaa niitä. Katsotaan kuinka se tehdään. Ensin tarkastellaan kuinka kiertää molempia kahvoja samanaikaisesti. Pidä Ctrl (Win) / Command (Mac) -näppäintä painettuna kiinnityspisteellä ja jo luomillamme kahdella suuntakahvalla. Näet kynätyökalun kuvakkeen muuttuvan väliaikaisesti suoran valinnan työkaluksi (valkoinen nuoli) ja siksi, että kun kynätyökalu on valittuna, "Ctrl / Command" -näppäimen pitämisestä tulee nopea pikakuvake väliaikaiseen käyttöön suoravalintatyökalussa, joka on mitä valitsemme polun eri osia. Napsauta sitten vain suoraan pienellä timantin muodolla jommankumman suuntakahvan päässä (itse "viivan" napsauttaminen ei toimi, joten sinun on aina napsautettava vinoneliön muotoa kahvan päässä, jotta voit tehdä mitä tahansa ja vedä sitä kiinnityspisteen ympäri kääntääksesi sitä. Kun kiertetään yhtä kahvoista, toinen kahva pyörii yhdessä sen kanssa vastakkaiseen suuntaan, tavallaan kuin saha. Saatat myös huomata, että heti kun alat vetää kahvaa, hiiren kohdistinkuvake muuttuu jälleen kerran, tällä kertaa Siirrä työkalu -kuvaketta, koska siirrämme jotain paikasta toiseen:
Pidä "Ctrl" (Win) / "Command" (Mac) painettuna ja napsauta jommankumman suuntakahvan päätä ja vedä kahvaa kiertääksesi sitä kiinnityspisteen ympäri. Kun vedät yhtä kahvaa, toinen pyörii vastakkaiseen suuntaan.
Voit vapauttaa Ctrl / Komento-näppäimen, kun olet alkanut vetää kahvaa. Sinun ei tarvitse pitää sitä koko ajan.
Jos haluat muuttaa suuntakahvan kokoa kääntäessäsi sitä, vedä kahvan päätä kohti kiinnityspistettä, jotta se lyhenee, tai vetämällä sitä pois kiinnityspisteestä, jotta se pidempään. Kuten edellä mainitsin, lyhyempi kahva tekee käyrästä lyhyemmän ja pidempi kahva tekee käyrän pidemmäksi. Et voi muuttaa molempien kahvojen kokoa samanaikaisesti, joten jos joudut muuttamaan molempien kahvojen kokoa, sinun on vetävä kumpaakin pidempään tai lyhyemmäksi erikseen. Ainoa asia, jonka voit tehdä molemmille samanaikaisesti, on kääntää niitä. Jos olet jo vapauttanut hiiren painikkeen kahvojen kiertämisen jälkeen ja kohdistin on muuttunut takaisin Kynätyökalukuvakeksi ja sinun on muutettava yhden kahvan kokoa, joudut pitämään Ctrl / Komento -painiketta painettuna vielä kerran väliaikaisesti siirry takaisin suoravalintatyökaluun ja napsauta ja vedä kahvan päätä sen koon muuttamiseksi:
Vedä kahvojen päätä sisään kiinnityspistettä kohti lyhentääksesi niitä, tai vetämällä ne pois kiinnityspisteestä, jotta ne pitenevät.
Nyt tarkastellaan kuinka kääntää kahvoja toisistaan riippumatta. To rotate one handle without affecting the other one, first release your mouse button if you've been rotating or resizing the handles so your cursor changes back into the Pen Tool icon. Then, instead of holding down "Ctrl/Command", which moves both handles at once, hold down your Alt (Win) / Option (Mac) key and click on the end of either of the direction handles. You'll see your cursor change into the Convert Point Tool icon, which looks like a simplified arrow made of only two lines, almost like an upside down letter "v" (except that it's not quite upside down). Then, simply drag the handle around the anchor point to rotate it, just as you did before, and this time, the handle will rotate independently of the other one, breaking the connection between them:
Hold down "Alt" (Win) / "Option" (Mac) and click on the end of either of the direction handles, then drag the handle to rotate it around the anchor point independently of the other handle.
Again, you can release your "Alt/Option" key after you've started dragging. You don't have to hold it down the whole time.
You can also resize direction handles using the "Alt/Option" key in exactly the same way as you can with the "Ctrl/Command" key. If you're in the process of rotating a handle, simply drag it in towards the anchor point to make it shorter or away from the anchor point to make it longer. If you've already released your mouse button and your cursor is showing the Pen Tool icon again, you'll need to hold down "Alt/Option" once again, then click on the end of the handle and drag it to resize it.
Is there a difference between resizing the handles using "Ctrl/Command" and using "Alt/Option" to do it? Yes there is. If you haven't yet "broken the connection" between the handles by dragging one independently of the other, resizing a handle using "Ctrl/Command" will keep the handles connected together. It won't resize both handles at once, but it won't break the connection between them either so you'll still be able to rotate them together if you need to. If you resize a handle using "Alt/Option", you'll break the connection between the handles. Even if you don't rotate the handle as you're resizing it, the connection will still be broken.
What if you've broken the connection between the handles by rotating them using "Alt/Option" and then want to rotate them together again? Can you "rebuild the connection", so-to-speak, by selecting one of them while holding down "Ctrl/Command" as before? Good question, and the answer is no. Once you've broken the connection between the handles, the "Ctrl/Command" key on its own won't bring it back. You'll need to select one of the handles while holding Ctrl+Alt (Win) / Command+Option (Mac) at that point in order to move the handles together again.
Quick Summary So Far …
We've covered a lot of information here about working with direction handles, so before we move on and start drawing some actual curves, let's do a quick recap:
- To add an anchor point, simply click with the Pen Tool.
- To add an anchor point with direction handles extending out from it, click with the Pen Tool, then drag away from the anchor point before releasing your mouse button. The further you drag, the longer the direction handles will be.
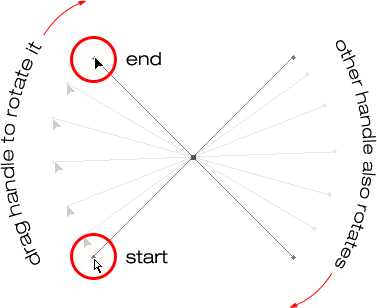
- To rotate the direction handles together, hold down Ctrl (Win) / Command (Mac), which will temporarily switch you to the Direct Selection Tool, then click on the end of either handle and drag it around the anchor point. The other handle will rotate in the opposite direction.
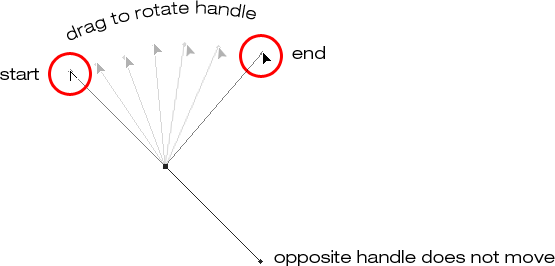
- To rotate the direction handles independently, hold down Alt (Win) / Option (Mac), which will temporarily switch you to the Convert Point Tool, then click on the end of either handle and drag it around the anchor point. The other handle will not rotate.
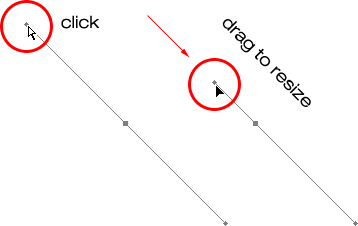
- To resize handles without breaking the connection between them, hold down Ctrl (Win) / Command (Mac) to switch to the Direct Selection Tool, then click on the end of either handle. Drag it towards the anchor point to make it shorter, or drag it away from the anchor point to make it longer.
- To resize handles and break the connection between them, hold down Alt (Win) / Option (Mac) to switch to the Convert Point Tool, then click on the end of either handle. Drag it towards the anchor point to make it shorter, or drag it away from the anchor point to make it longer.
- To rotate the direction handles together after breaking the connection, hold down Ctrl+Alt (Win) / Command+Option (Mac), then click on the end of either handle and drag it around the anchor point. The other handle will once again rotate with it.
Okay, that pretty much covers the basics of how to control the direction handles. Let's see how we can use them to draw some curves!
We've covered a lot of ground so far. We know about anchor points and direction handles. We know that in order to draw straight path segments, all we need to do is lay down a series of anchor points wherever we need them simply by clicking with the Pen Tool, and as we add more and more anchor points, we add more straight sections to our path. We know how to create direction handles and how to rotate them, either together or separately, and how to resize them.
We know how to turn a path into a selection by clicking on the "Load path as selection" icon at the bottom of the Paths palette or by simply pressing "Ctrl+Enter" (Win) / "Command+Return" (Mac) on the keyboard. One thing I didn't mention yet is that regardless of whether our path consists of straight lines,
curves, or a combination of straight lines and curves, converting it into a selection is done exactly the same way, and we've already learned how to do it, which means we're well on our way to mastering making selections with the pen! All we need to do is get a bit of practice drawing curves, which is exactly what we're about to do!
Vieritkökö edelleen? Lataa tämä opetusohjelma PDF-muodossa!
Drawing A Curve
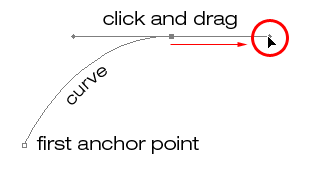
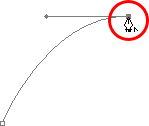
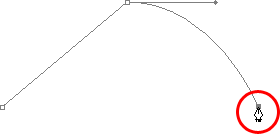
Let's once again start fresh, either by opening up a new blank document in Photoshop or by deleting what you've already done. We're going to draw our first curve so we can put all of our newly-aquired direction handle knowledge to use. First, with the Pen Tool selected and the Paths option selected in the Options Bar, click once somewhere in your document to add an anchor point. Just click, don't click and drag. You should have one single anchor point on the screen when you're done.
Then, move your mouse cursor up and to the right of your initial anchor point. Click again to add a second anchor point, but this time, drag your mouse a little to the right of the anchor point to drag out direction handles. Hold down Shift as you drag to constrain your movement to a horizontal direction. As you drag out the direction handles, you'll see your path appearing as a curve between the two anchor points! The further you drag your mouse, the longer you make the direction handles, and the more of a curve you create:
Click once to add an anchor point, then click and drag out a second anchor point with direction handles, creating a curved path segment between the two points.
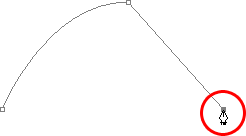
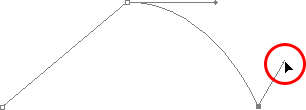
Click down and to the right of the second anchor point to add a third anchor point. This time, don't click and drag, just click:
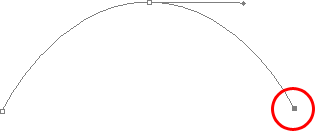
Add a third anchor point down and to the right of the second one by clicking with the Pen Tool.
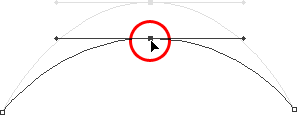
As soon as you add the third anchor point, a second path segment will appear, joining the second anchor point with the third one. And because our second anchor point has direction handles extending from it, this new path segment is also curved! We now have a nice, smooth arc starting from the first point on the left, then passing through the anchor point with the direction handles up top, and coming to an end at the third point.
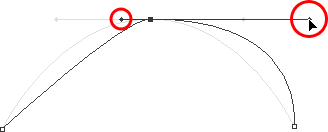
One thing you may have noticed, and you can see it in the screenshot above, is that when you added the third anchor point, the direction handle extending out the left side of the second anchor point disappeared. It's still there, Photoshop simply hid it from view. To see it again, use the keyboard shortcut we've already learned to temporarily switch to the Direct Selection Tool, which is by holding down the Ctrl (Win) / Command (Mac) key, and then click on the second anchor point to select it. As soon as you do, the missing direction handle reappears as if it was there the whole time (which it was):

Hold down the "Ctrl" (Win) / "Command" (Mac) key to temporarily switch to the Direct Selection Tool, then click on the top anchor point to select it. The missing anchor point reappears.
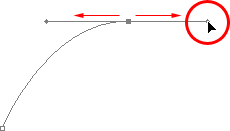
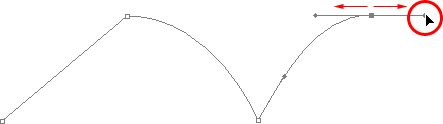
With your "Ctrl/Command" key still held down so you still have access to the Direct Selection Tool, try resizing each direction handle by clicking on the end of each one to select it and then dragging it towards and away from its anchor point. Again, hold "Shift" as you drag to constrain your movement horizontally, and watch what happens. As you increase the length of a handle, you get more of a curve, and as you decrease its length, you get less of a curve. Also notice that each handle controls its own side of the curve. The handle on the left controls the curve coming into the anchor point from the left, and the handle on the right controls the curve flowing out from the anchor point on the right.
Here, I've made my handle on the left shorter, and as we can see, there's much less of a curve now than there was originally, almost becoming a straight line. I've also made the handle on the right longer, and as a result, the curve on the right is now much more pronounced. The faint curve is the original for comparison:
Change the shape of the curves by resizing the direction handles. The left handle controls the left curve, and the right handle controls the right curve.
I'm going to undo my changes by pressing Ctrl+Alt+Z (Win) / Command+Option+Z (Mac) a couple of times to set my direction handles back to their original sizes so they're equal length once again. Now let's try rotating the handles. Hold down "Ctrl/Command" once again to access the Direct Selection Tool, then click on the end of either handle to select it and try rotating it around the anchor point. Since we selected the handle with "Ctrl/Command", both handles rotate together. Here I've dragged my left handle down and to the right, and the angle of the curve on the left changed along with it, now appearing as more of a slope as it rises up towards the anchor point. By dragging the left handle down and to the right, I caused the right handle to rotate up and to the left, and again, the angle of the curve on the right changed along with it, now rising above the anchor point briefly before making a steep decent down to the anchor point on the right. Again, the faint curve is the original for comparison:
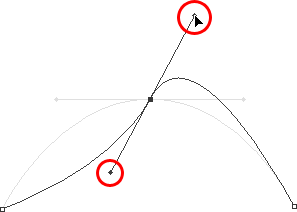
Rotate the direction handles to change the angle of the curves. Select a handle while holding "Ctrl" (Win) / "Command" (Mac) to rotate both handles together.
The Dreaded "Loop"
One thing you want to avoid is rotating the handles too far, which will cause your path segments to overlap and create loops. Here, I've rotated my handles all the way around so that the left handle is now on the right and the right handle is on the left, and notice what's happened. My path segments are now overlapping each other, creating a loop:
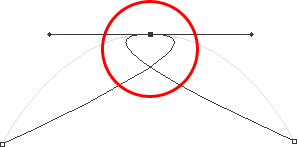
Rotating the direction handles too far causes the path segments to overlap, creating an unwanted loop in the path.
Loops can be caused by rotating the direction handles too far, as I've done above, but more often than not, they're caused by a handle being too long, making the curve too long and causing it to overlap with itself. If that happens, which it does sometimes as you're drawing a path, simply shorten the length of the direction handle. Most people end up creating a whole bunch of loops in their path when they first start working with the Pen Tool, so don't think you're the only one. No need to panic or become frustrated though. As I said, the problem is most likely being caused by a direction handle being too long, and all you need to do is shorten the handle to "un loop" the loop!
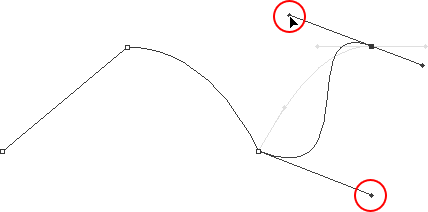
I'm going to press Ctrl+Alt+Z (Win) / Command+Option+Z (Mac) a few times once again to undo my changes and reset my path back to the nice smooth arc I started with. Now, what about rotating the direction handles independently of each other? As we learned on the previous page, to rotate the handles separately, instead of selecting them with "Ctrl/Command", we simply select them while holding down Alt (Win) / Option (Mac), which gives us temporary access to the Convert Point Tool. Click on the end of a handle to select it, then drag it with your mouse to rotate it and this time, the other handle will stay in place, breaking the connection between them.
Here, I've selected the handle on the right while holding "Alt/Option" and then rotated it down and to the left. Notice how once again, the angle of the path segment on the right changes to match the new direction of the handle, and this time, the handle on the left, along with the path segment on the left, both stay in place. My path now looks a bit like a shark fin:
Hold down "Alt" (Win) / "Option" (Mac) to temporarily access the "Convert Point Tool", then click on the end of a direction handle to select it and rotate it independently of the other handle.
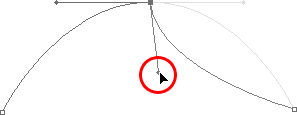
Moving An Anchor Point
One thing we haven't looked at yet is how to move an anchor point. If you recall, I mentioned on the previous page that the Pen Tool is extremely forgiving, and one of the reasons for it, besides being able to rotate and resize our direction handles after we've created them, is that we can easily move anchor points from one spot to another if we need to. As we've already learned, anchor points anchor a path into place. The anchor points themselves, however, are not anchored into place. You can move an anchor point anywhere, anytime, and any path segments that are connected to it will move and adjust right along with it.
To move an anchor point, hold down Ctrl (Win) / Command (Mac) to temporarily access the Direct Selection Tool as we've already been doing, then simply click on the anchor point to select it and drag it to its new location with your mouse. Any path segments connected to it will move with it to the new location. Here, I've dragged my middle anchor point down a bit from its original location (again, the faint path marks the original location for comparison). Notice how the path itself has changed shape to adjust to the new location of the anchor point:
Hold down "Ctrl" (Win) / "Command" (Mac) and click on an anchor point to select it, then drag it to a new location. Any path segments connected to the point will move with it, changing shape as needed.
Normally, when outlining an object with a path to select it using the Pen Tool, you won't need to move to an anchor point quite as far as what I've done above, but it's very common to go back around your path after you've created it and nudge a few anchor points here and there to fine-tune the path. Once you've selected an anchor point, you can nudge it up, down, left or right using the arrow keys on your keyboard.
Combining Straight Paths With Curves
What if I didn't want both of my path segments to be curves? What if what I needed was for the first path segment to be curved, but the second one needed to be straight? Let's see how to do that. I'm going to delete my existing path and start over again. First, I'll click to add an anchor point to start things off. Then, just as before, I'll click to add a second anchor point up and to the right of my initial point, and this time, I'll drag out direction handles, which will create a curved path connecting the two points, giving me exactly what I had way up at the start of this page:
Click once to add an anchor point, then click to add a second anchor point and drag out direction handles to create a curve.
I now have my initial curve, but I want my next path segment to be straight. If I was to simply click somewhere to add another anchor point right now, I would get another curve because I have that direction handle extending out from the right side of the last anchor point I added. What I need to do is get rid of that one direction handle. Without a direction handle controlling the angle and length of a curve, we get a straight line.
To remove the handle, leaving only the handle on the left of the anchor point, all I need to do is hold down Alt (Win) / Option (Mac), which will again temporarily switch me to the Convert Point Tool, and then I just click directly on the anchor point. When I do, the direction handle on the right disappears, leaving only the one on the left:
Hold down "Alt" (Win) / "Option" (Mac) and click directly on the anchor point to remove the direction handle on the right, leaving only the one on the left.
Now, with the direction handle gone, if I click to add a new anchor point, I get a straight path segment between the two points :
With the direction handle on the right now gone, clicking to add a new anchor point adds a straight path segment between the two points.
I now have a curved path segment on the left and a straight one on the right! What if I wanted the exact opposite? Suppose I needed to start with a straight path segment and then follow it with a curve? To do that, first I'll start by clicking to add an initial anchor point. Then, since I want a straight path segment, all I need to do is click somewhere else to add a second anchor point, and I automatically get a straight path connecting the two points:
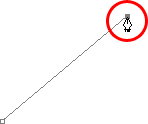
Click with the Pen Tool to add an initial anchor point, then click again somewhere else to add a second anchor point and create a straight path segment between them.
I'm going to keep my mouse button held down after clicking to add my second anchor point because I want my next path segment to be curved, and we know that in order to create a curve, we need a direction handle. To add a handle extending out from the right of my anchor point, I'm going to hold down Alt (Win) / Option (Mac), and with my mouse button still down, I'm simply going to to drag to the right of the anchor point. As I do, a direction handle will drag out along with it:
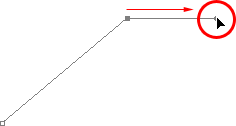
Hold down "Alt" (Win) / "Option" (Mac) and drag out a direction handle on the right of the anchor point.
Notice that the direction handle extended only from the right of the anchor point, not from both sides, leaving my straight path segment on the left in place. And now that I have my direction handle on the right, all I need to do to create my curve is click to add a third point:
Click to add a third anchor point, which creates a curved path segment between the previous anchor point and the new one.
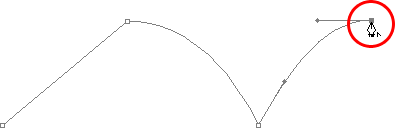
And there we go! I now have a straight path segment on the left, followed by a curved segment on the right. Of course, most paths you draw are going to consist of more than just three anchor points. Let's say I wanted to continue this path, moving in the same general direction towards the right, and I want my next path segment to be curved as well. Just as I did a moment ago, I would leave my mouse button held down after clicking to add my third point. I would hold down Alt (Win) / Option (Mac) and I would drag out another direction handle. So far, we've only been dragging handles out towards the right, but what you really want to do is drag your handles out in the general direction you want the curve to follow. I want to create a curve that goes up and to the right, so I'm going to drag out a small handle in that same general direction:
Drag out your direction handles in the general direction of the curve.
Kärki! A good practice to get into is to keep your direction handles small when first dragging them out, since you never really know how long or at what exact angle they need to be until the actual curve appears, and the curve doesn't appear until you've added both of its anchor points. Once you've added both points and the curve appears, you can easily go back and make any adjustments you need to the handles. You may even want to wait until you've drawn the entire path before worrying about adjusting the handles.
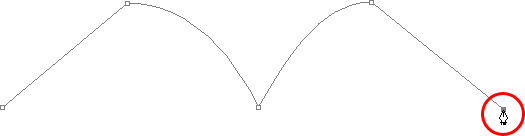
With my direction handle created, I'm going to click to add a fourth anchor point, and I'm going to drag out direction handles from it as well:
Adding a fourth anchor point along with direction handles extending from it.
I now have a third segment added to my path, this one being a curve. Notice that this curve actually has two direction handles controlling it, one extending from the right of my third anchor point and one extending from the left of my fourth point:

The third path segment now has two direction handles, one on either end, working together to control the curve.
The overall shape of this curve is now being controlled by the length and direction of both of these handles. Watch what happens to the curve when I move the handles. I'll drag the bottom handle down and to the right, and I'll drag the top handle up and to the left. I'll also drag both of these handles longer. The faint curve is the original for comparison:
Changing the direction and/or length of either handle changes the overall shape of the curve. After rotating and lengthening both handles, the curve now appears in an "S" shape.
The curve is now a bit "S" shaped, and that's because the bottom handle is controlling the angle and length of the curve as it flows out from the third anchor point, while the top handle is controlling the angle and length of the curve as it flows into the fourth point. Changing the length and/or direction of either handle will change the overall shape of the curve.
I'm going to press Ctrl+Alt+Z (Win) / Command+Option+Z (Mac) a couple of times to undo the changes I made, so the curve is once again in a simple arc shape as it was a moment ago, and I think I'll finish off this path with another straight segment, which means I'll need to remove that direction handle extending out from the right side of the fourth anchor point. We've already learned how to do that, by holding down Alt (Win) / Option (Mac) and clicking directly on the anchor point itself:
Hold down "Alt" (Win) / "Option" (Mac) and click directly on the anchor point to remove the direction handle on the right.
With the direction handle gone, all I need to do now to add a straight path segment is click to add another anchor point:
The direction handle on the right is now gone, so we can add a straight path segment simply by clicking to add another anchor point.
We could continue this path for as long as we wanted, adding more straight segments and curves, but I think we'll stop here because we've pretty much covered everything we need to know about drawing paths with the Pen Tool at this point. That was a lot of information to take in, especially if this is your first time learning about paths. As I mentioned at the beginning, you won't become a Pen Master simply by reading through this tutorial, just as you won't learn how to ride a bike, or drive a car, learn to swim, or play the piano simply by reading about it. But hopefully you have some sense at this point of how to draw paths with the Pen Tool, how to draw straight path segments, how to draw curves by dragging out direction handles, how to change the length and angle of the curve by rotating and resizing the handles, and how to combine straight and curved segments in a path.
To finish off our look at making selections with the Pen Tool, let's see a practical example of how to select an object with curves.
Here, we have a photo of a couple of dolphins leaping out of the water. Definitely a couple of very curvy creatures:
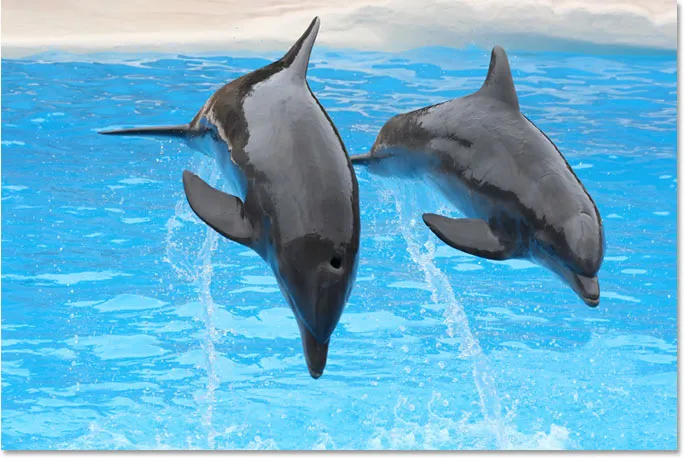
A photo of two dolphins jumping out of the water.
Let's say we want to select these dolphins so we can use them for a design or a collage, or whatever the case may be. If you were to try selecting them with the Lasso Tool, which is most likely what you would end up using if you didn't know how to use the Pen Tool, not only would you have a tough time, you'd have an even tougher time trying to convince yourself that you were happy with the results when you were done. The reason is because the Lasso Tool simply isn't capable of making curved selections very well. The biggest problem with it, besides being a pixel-based selection tool, is that it relies on you having a steady enough hand to move it smoothly around the curves. Even if you don't suffer from a caffeine addiction, you could drive yourself crazy trying to draw a perfectly smooth curve with your mouse, or even with a pen tablet, and when you've finally given up, you'll still be left with a selection full of rough, jagged edges that just scream "amateur!". No one likes to be called an amateur, especially when there's no need for it thanks to the Pen Tool!
Examine The Object First
Whenever you're about to select something with the Pen Tool, before you begin, take a moment to examine the object carefully to get a sense of where you're going to need to place your anchor points. Forget about all the details in the object and focus only on its shape. Where are the areas where the shape changes direction? Which parts of the shape are straight? Which parts are curved? If there's a curve, is it a smooth, continuous arc or does the angle change at a spot along the curve? Visualize in your mind where you're going to need to place your anchor points, because when you place one, you always want to be thinking about the next one and what the path segment between the two points needs to look like.
A Tool Of Elegance
One more thing to keep in mind is that the Pen Tool is meant to be a tool of elegance . It's not a nail gun or a staple gun. You don't want to just go clicking around your shape adding anchor points all "willy nilly" (that's a technical term). When using it to draw curves, you want those curves to be nice and smooth, otherwise we might as well just stick with the Lasso Tool. To keep the curves flowing smoothly, we need to limit the number of anchor points we use to create them. That's why you want to take a moment to examine the object first and visualize where the anchor points need to be. If you can outline a large section of the shape using only one curve with an anchor point on either end, that's what you want to do, because that's what's going to give you the kind of results you're looking for. The kind of results that scream "definitely not an amateur!".
Let's select these dolphins. I'm going to start my path in the middle of the photo, at the spot where the side of the dolphin on the left overlaps the rear flipper of the dolphin on the right. There's no right or wrong place to begin a path. This is just where I've decided to start. The first part of that rear flipper is straight, so since I don't need a direction handle to create a straight path segment, I'm simply going to click once with my Pen Tool to add my first anchor point, which will serve as the starting point for my path:
Adding the first anchor point.
As I mentioned earlier, you'll probably find it helpful to zoom in on your image as you're drawing your path. To scroll the image around on the screen as you're zoomed in, hold down the spacebar, which will switch you temporarily to the Hand Tool and allow you to move the image around on the screen by clicking and dragging it.
The top of that flipper actually has a slight curve to it as it approaches the dolphin's tail section, so for my second anchor point, I'm going to click at the point where the flipper and tail section meet, and I'm going to drag out short direction handles, dragging up and to the right in the direction that the tail section is moving. Notice that I've now created a slight curve along the flipper:
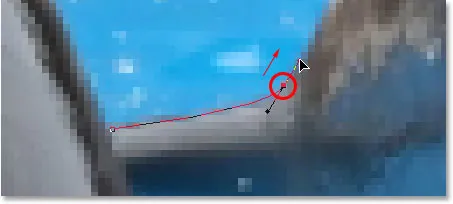
Adding the second anchor point and dragging out small direction handles to add a slight curve to the first path segment.
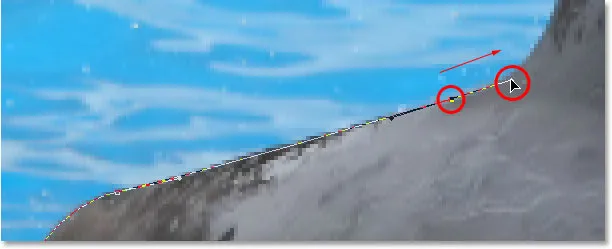
As I continue up along the tail, I can see that it stays straight for a short distance, followed by a curve to the right, so I'm going to click to add a third anchor point at the spot where the curve begins. This gives me a straight path segment between the previous point and the new one. I know there's a short direction handle extending out from the previous anchor point, which normally means that my new path segment will be a curve, not a straight section, but because the handle is so short and is also moving in the same direction as the path segment, there is no noticeable curve to it. Consider it a "mostly straight" path segment:
Clicking to add the third anchor point, creating a (mostly) straight path segment.
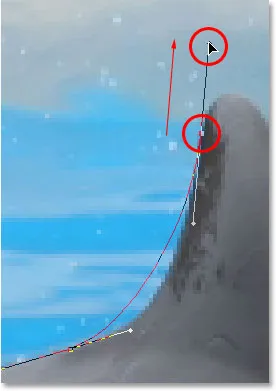
Continuing along, we come to the first real curve in our path. For this, I'm going to need to drag out a direction handle from the anchor point I just added, so I'm going to hold down Alt (Win) / Option (Mac), then drag out a handle in the general direction where I want the curve to flow as it starts. Notice how I'm only dragging out a handle from the one side of the anchor point, not both:
Hold "Alt" (Win) / "Option" (Mac) to drag out a direction handle from one side of an anchor point.
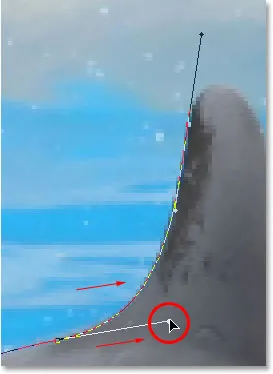
To add the curve, I'll click and drag at the spot where the curve ends, shaping the curve as I drag out the handles until it matches the curve of the dolphin's tail. If I needed to, I could also go back and change the length and direction of the handle at the start of the curve to fine-tune it, but in this case, I don't need to do that:
Adding an anchor point at the opposite end of the curve and dragging out direction handles from it, rotating and resizing them as needed until the curve matches the curve of the object.
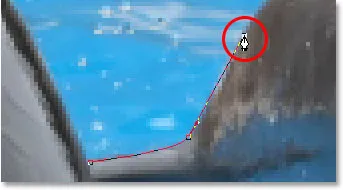
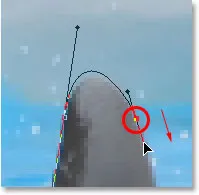
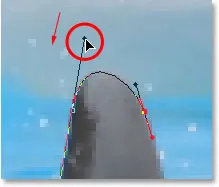
The next area of the dolphin is pretty straight, right up until its back begins to merge with its dorsal fin, at which point there's another curve, so I'm going to click to add an anchor point just before the curve up the dorsal fin begins, which is going to give me another "mostly straight" path segment between the previous point and the new point. Then I'm going to once again hold down Alt (Win) / Option (Mac) and drag out a direction handle as I prepare for my next path segment which will be curved:
Click to add an anchor point, then hold down "Alt" (Win) / "Option" (Mac) and drag out a direction handle to prepare for the next path segment.
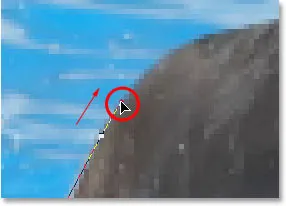
The left side of the dorsal fin consists mainly of one continuous curve upward until it gets near the very top, at which point the shape changes, so to create this curve, I'm going to click and drag at the point near the top where the curve will change direction. As we can see in the screenshot, this adds a curved path segment between the previous anchor point and the new one, but the curve is not yet following along the shape of the fin. It's going to need some fine-tuning:
Adding a curve along the left side of the dorsal fin. The curve still needs some adjusting.
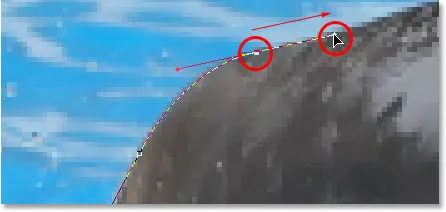
To adjust the curve, I'm simply going to hold down the Ctrl (Win) / Command (Mac) key, which gives me temporary access to the Direct Selection Tool, and I'm going to drag the handle extending out from the bottom anchor point towards the right to lengthen it, which is going to pull the angle of the curve in towards the right along with it, lining it up nicely with the curve of the fin. I've also rotated the top direction handles slightly in a clockwise direction just to be nit-picky, but the majority of the adjustment was done using the bottom direction handle:
Adjust the curve by adjusting its direction handles.
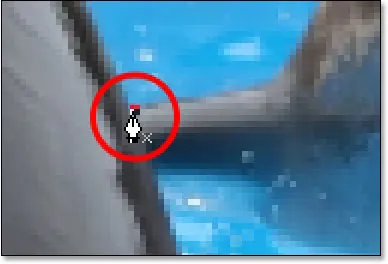
To add a curve around the top of the fin, I'll click and drag on the opposite side of it to add another anchor point with short direction handles. Notice though that we run into a bit of a problem. The direction handle on the left side of the curve is too long and it's pulling the curve away from the top of the fin:
The direction handle on the left of the curve is too long, resulting in the curve not following the shape of the fin.
To fix that, all I need to do is once again hold down Ctrl (Win) / Command (Mac), then click on the end of the handle to select it and drag it shorter until the curve is the proper shape:
Shortening the length of the direction handle to adjust the shape of the curve.
Let's finish creating our path around the dorsal fin. The remainder of the fin is basically a straight line, so I'm going to click at the base of the fin to add another anchor point which adds the straight path segment, completing our path around the fin:
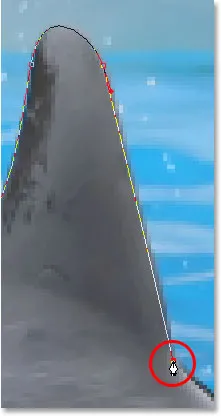
Adding an anchor point at the base of the fin to finish drawing the path around it.
Since you and I would both be here all day if I was to continue commenting on every anchor point, direction handle and path segment as we make our way slowly around the dolphins, and since we've covered everything we need to know at this point, I'm going to go ahead and draw the rest of the path, outlining both dolphins:
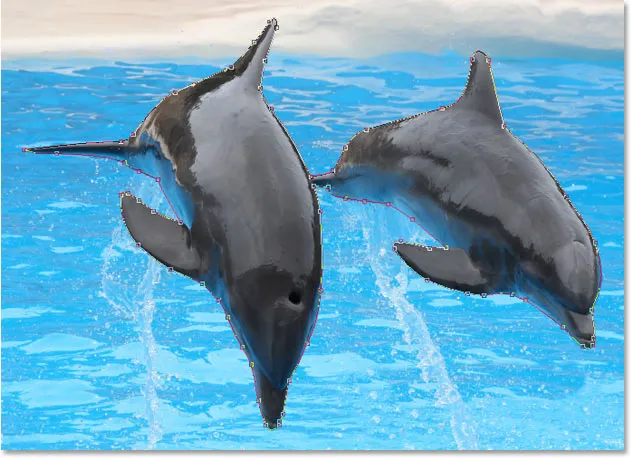
Both dolphins are now outlined by the path.
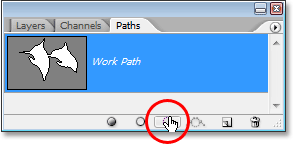
The dolphins have now been outlined with the path, and if we look at the Paths palette, we can see that sure enough, we have a path in the shape of the dolphins:
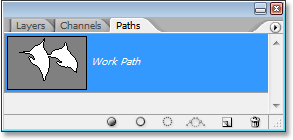
Photoshop's Paths palette showing the outline of the dolphins in the preview thumbnail.
As we've learned, Photoshop automatically names the path "Work Path", which means it's temporary and will be replaced if we start a new path. If you wanted to save it, you would need to double-click on the name "Work Path" and rename it to something else, like "Dolphins" in this case. I'm not going to worry about that, since I have no need to save it. All I want to do at this point is convert my path into a selection, and since I'm already in the Paths palette, I'll do that by clicking on the Load path as selection icon at the bottom of the palette:
Clicking the "Load path as selection" icon at the bottom of the Paths palette.
I could also have used the keyboard shortcut Ctrl+Enter (Win) / Command+Return (Mac) . Either way converts my path into a selection, and if I look at my photo, I can see that my path has indeed become a selection around the dolphins:

The path around the dolphins has now been converted into a selection.
Minne mennä seuraavaksi …
Ja siellä meillä se on! The dolphins are now selected and ready for whatever plans we have for them. And with that, we wrap up our look at drawing paths and making selections with the Pen Tool in Photoshop! Lisätietoja Photoshopin valintatyökaluista on artikkelissa Kuinka tehdä valintoja Photoshop-sarjassa. Käy lisää Photoshop-aiheita Photoshop Basics -osiossa!